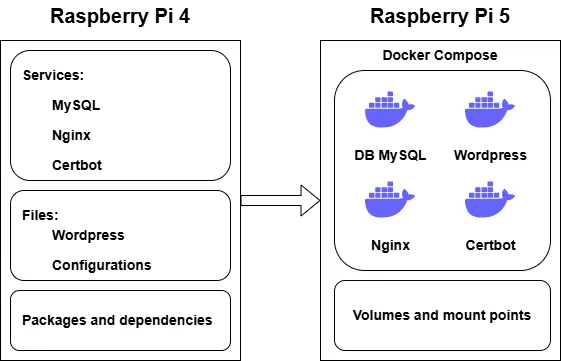
To migrate WordPress to Docker on a Raspberry Pi effectively, one must transition from traditional system-level services to a modern, containerized architecture. This migration not only improves the reliability of your Raspberry Pi 5 setup but also simplifies long-term maintenance by isolating WordPress, PHP-FPM, and MySQL into independent, manageable units.
One of these services was this WordPress website. The process wasn’t simple, but after outlining each step clearly, everything worked exactly as expected.
Introduction
Docker makes it possible to isolate components such as WordPress, PHP-FPM, MySQL, and Nginx into independent, easily manageable containers. This greatly simplifies future updates, disaster recovery, migration to new hosts, and scaling. However, migrating an existing Nginx configuration requires special attention: paths for the root directory, FastCGI, SSL, and ACME challenges differ between the host system and the container environment, which often leads to configuration errors.
Certbot also deserves separate consideration: the nginx plugin does not work inside Docker, so it is important to switch to the webroot method in time. Once this is done, certificate renewals will function reliably.
After launching the containers and verifying that the site works correctly in the local environment, the final step is to update the port forwarding rules on the router – and WordPress becomes fully operational in its new containerized setup.
In my case, the migration happened within the same local network between two Raspberry Pi devices, so all DNS records remained associated with the same public IP address.
The process is not as complicated as it may seem, as long as you proceed step by step and understand how the services interact. Thanks to Docker, my WordPress installation now runs on a clean, predictable, and universal infrastructure that is ready for future enhancements and updates.
Now let’s walk through the migration process step by step!
Preparing the Raspberry Pi
Since this was not just a migration but an upgrade to a newer and more powerful hardware platform, I also updated the operating system from Raspberry Pi OS Bookworm to Trixie.
I moved the system to a fast NVMe drive and outlined the main stages of the migration:
- Installing Docker
- Creating the docker-compose file
- Transferring the data
- Adjusting the configurations
- Verification and testing
Each of these steps will be described in detail, as all components are closely interconnected.
With your WordPress site now public, don’t forget to protect it – check out my experience with Cloudflare DDoS protection Raspberry Pi setup.
Installing Docker
The Docker installation process is described in detail on the official website, so here I will simply show the exact commands I used:
sudo apt install ca-certificates curl gnupg

sudo mkdir -p /etc/apt/keyrings
curl -fsSL https://download.docker.com/linux/debian/gpg | \
  sudo gpg --dearmor -o /etc/apt/keyrings/docker.gpg

echo \
  "deb [arch=$(dpkg --print-architecture) \
  signed-by=/etc/apt/keyrings/docker.gpg] \
  https://download.docker.com/linux/debian \
  $(lsb_release -cs) stable" | \
  sudo tee /etc/apt/sources.list.d/docker.list > /dev/null

sudo apt update
sudo apt install docker-ce docker-ce-cli containerd.io docker-buildx-plugin docker-compose-plugin
To prevent Docker from requiring elevated privileges on every command and to avoid potential permission errors, I added my user to the Docker group.
sudo usermod -aG docker $USER
newgrp docker
With Docker now installed, the next step is to create the necessary containers with the required parameters using a centralized solution – Docker Compose.
Since this migration was part of a hardware upgrade, I first ensured my OS was running on a high-speed Raspberry Pi 5 and NVMe SSD setup.
Defining the Structure
The docker-compose file will be placed in the main project directory. I chose to create this directory inside my home folder, so the full path looks like:
~/Docker/SitesInside this directory, the following subdirectories and files will be created:
- docker-compose.yml – the main configuration file for all Docker containers
- .env – the environment variables file
- MYSQL_ROOT_PASSWORD=<strong root password>
- MYSQL_USER=<username>
- MYSQL_PASSWORD=<strong user password>
- ostrich – a directory that will store the WordPress files (wp-admin, wp-content, wp-config.php, etc.)
- certificates – this directory is used by Certbot to temporarily store ACME challenge files required by Let’s Encrypt for domain validation
Each of these directories will later be mounted into the appropriate container. These mount points are configured directly in the docker-compose file.
As for the containers themselves, there will be four:
- webserver – an Nginx web server operating on ports 80 and 443
- ostrich_wp – the WordPress container; at the time of writing, version 6.9
- ostrich_db – a container running MySQL Community Server
- certbot – a container responsible for certificate renewal, started periodically via Cron
Writing the docker-compose File
For better clarity, I’ll describe the docker-compose.yml file block by block. This way we can gradually create the resources and consistently control each stage of their interaction.
The definition of services starts with the following block:
services:Database
I’ll start by describing the services from the very beginning. The first one is the database container based on MySQL major version 8.4. For secure data handling, all sensitive environment values are moved into a separate .env file, while non-sensitive options can be defined directly in the environment section.
When the container is created for the first time, a volume is automatically initialized to store the database files, and this data is automatically mounted each time the container starts.
To enable communication between the Docker containers, a dedicated network called ostrich_net will be created. I’ll refer to it later, but to avoid repeating this every time, keep in mind that this network block is used for all services.
  db:
    image: mysql:8.4
    container_name: ostrich_db
    restart: unless-stopped
    env_file: .env
    environment:
      - MYSQL_DATABASE=wordpress
    volumes:
      - dbdata:/var/lib/mysql
    networks:
      - ostrich_net
WordPress
The second service is the container running WordPress itself. This container has a direct dependency on the database, so we explicitly declare it using the depends_on parameter. For authentication and connection details, we also use the .env file and additionally specify the database port and name via environment variables.
The previously created ostrich directory needs to be mounted into this container, because it is required for plugins and themes to write files (uploads, cache, etc.), and for PHP-FPM to see wp-config.php, wp-content, wp-admin, wp-includes, and the rest of the WordPress core.
wordpress:
    depends_on:
      - db
    image: wordpress:6.9.0-fpm-alpine
    container_name: ostrich_wp
    restart: unless-stopped
    env_file: .env
    environment:
      - WORDPRESS_DB_HOST=db:3306
      - WORDPRESS_DB_USER=$MYSQL_USER
      - WORDPRESS_DB_PASSWORD=$MYSQL_PASSWORD
      - WORDPRESS_DB_NAME=wordpress
    volumes:
      - ./ostrich:/var/www/html
    networks:
      - ostrich_net
Upgrading to the Pi 5 was the main driver for this project. You can see the real-world impact in my WordPress performance test Raspberry Pi 4 vs Raspberry Pi 5, where the loading times dropped significantly.
Web Server
The third block, and one of the most important ones, is the webserver. This container acts as the web server and listens on ports 80 and 443. It is also responsible for handling all virtual hosts configured inside Nginx.
This container also has a dependency on the WordPress service, because the site cannot function without the PHP-FPM backend.
The ostrich directory must be mounted here as well so that Nginx can serve the static files and forward PHP requests to FPM. In addition, we need to mount the Nginx configuration files, as well as the volume where certificates are stored and validated.
 webserver:
    depends_on:
      - wordpress
    image: nginx:stable-alpine
    container_name: webserver
    restart: unless-stopped
    ports:
      - "80:80"
      - "443:443"
    volumes:
      - ./ostrich:/var/www/html
      - ./nginx/nginx-conf:/etc/nginx/conf.d
      - ./certificates:/var/www/certbot:ro
      - certbot-etc:/etc/letsencrypt
    networks:
      - ostrich_net
In the webserver block of the docker-compose.yml, I chose Nginx. This decision was backed by my WordPress benchmark Apache vs Nginx, which showed Nginx to be much more efficient with static content and high concurrency.
Certificate
The last container is certbot. Unlike the other services, it is not meant to run permanently: it is started to check the certificate’s validity and renew it when necessary, and then it exits.
In this mode the container does not stay in the background all the time, which helps to optimize resource usage on the Raspberry Pi. Just like for the web server, we need to mount the directories that store the certificates and related configuration for Certbot.
certbot:
    depends_on:
      - webserver
    image: certbot/certbot
    container_name: ostrich_certbot
    volumes:
      - certbot-etc:/etc/letsencrypt
      - ./certificates:/var/www/certbot
To properly finish the docker-compose.yml file, we also need to define all volumes and declare the network that will be used for communication between the containers.
volumes:
  certbot-etc:
  dbdata:

networks:
  ostrich_net:
    driver: bridge
At this point we can move on to the next stage – transferring the files and importing the database.
Transferring Files and Importing the Database
We have already defined the mount points and volumes, so the next step is simply to copy the data from the host into the appropriate mounted directories. To recap, here is what needs to be copied and where:
- The entire contents of the WordPress directory should be copied into
./ostrich - The entire contents of the
letsencryptdirectory should be copied into thecertbot-etcvolume - The virtual host configuration files, including
options-ssl-nginx.conf, should be copied into./nginx/nginx-conf
The path to a volume typically looks like: /var/lib/docker/volumes/…/_data/ and access to this directory is only possible with superuser privileges.
Once all necessary files have been transferred, we can populate the database using the backup.
During the first startup of the database container, initialization takes place: system tables, the database, and user accounts are created according to the values defined in the .env file.
docker compose up -d dbAfter the database is created, we can import the backup:
docker exec -i wordpress mysql -u <username> -p wordpress < /tmp/ostrich_wp.sqlAfter completing these steps, the site will have all required data in place. Before starting the remaining containers, we need to apply a few additional configuration changes.
Web Server Configuration
Docker already includes a basic Nginx configuration, and for many cases this default setup is sufficient for running a web application. Since this article focuses specifically on migrating WordPress, I assume that you already have an existing virtual host configuration that you want to reuse.
However, when migrating from a host-based Nginx setup to Nginx running inside Docker, you cannot simply copy the configuration one-to-one – it must be adjusted!
To ensure the site works correctly, it is important to:
- Update the root path to match the directory structure inside the container.
- Switch fastcgi_pass from a Unix socket to
php-container-name:port. - Configure
/.well-known/acme-challenge/to use the shared volume with Certbot. - Update SSL certificate paths and the location of
options-ssl-nginx.confaccording to the container’s filesystem. - Verify
listenandserver_namedirectives so they match the domains and ports defined indocker-compose.yml.
Everything else – caching, security headers, performance optimizations – can usually be migrated with minimal or no changes. Let’s examine each essential adjustment:
Site Path – root
In a regular Nginx installation on a host system, you specify an absolute filesystem path. In Docker, this works differently: inside the container, the WordPress directory is mounted at a path such as /var/www/html.
On the host:
root /var/www/html/ostrich.kyiv.ua;In Docker:
root /var/www/html;Connecting to PHP-FPM
In this setup, PHP runs inside a separate container (wordpress), and Nginx communicates with it over the Docker network using port 9000. If you keep the Unix socket configuration from the host system, Nginx inside the container simply won’t be able to find PHP-FPM, causing .php files to download as plain files or triggering 502 Bad Gateway.
On the host:
fastcgi_pass unix:/run/php/php8.3-fpm.sock;In Docker:
fastcgi_pass wordpress:9000;ACME / Certbot
In Docker, a dedicated volume /var/www/certbot is created and shared between the Nginx and Certbot containers.
Without this shared directory, Let’s Encrypt domain validation will fail and the certificate will not renew.
On the host:
location ^~ /.well-known/acme-challenge/ {
    default_type "text/plain";
    allow all;
}
In Docker:
location ^~ /.well-known/acme-challenge/ {
    root /var/www/certbot;
    allow all;
}
SSL Certificate Paths and Options File
The certificate paths generally remain the same relative to how the volume is mounted, so they usually only require verification. The only actual change is the path to options-ssl-nginx.conf, which must be included from the location where it is mounted inside the Nginx container.
On the host:
include /etc/letsencrypt/options-ssl-nginx.conf;In Docker:
include /etc/nginx/conf.d/options-ssl-nginx.conf;I consider these the most important parameters to adjust during migration. Of course, every configuration is unique, so any additional optimizations or custom settings can be applied at your discretion.
Certificate Configuration and Renewal
The certificate configuration is stored inside the certbot-etc volume at the following path:
/var/lib/docker/volumes/.../_data/renewal/ostrich.kyiv.ua.confOn the host system, certificate renewal was performed using the Nginx plugin, but this plugin is not available inside Docker. Therefore, the renewal method must be switched to the webroot method instead.
On the host:
[renewalparams]
authenticator = nginx
installer = nginx
In Docker:
[renewalparams]
authenticator = webroot
webroot_path = /var/www/html
After this change, the certificate will use the new renewal method. However, these steps alone are not enough to ensure automatic renewal.
To enable certificate renewal, you must also create a Cron job. This job automates the regular verification and renewal of the SSL certificate to prevent it from expiring.
Since Certbot does not run continuously inside Docker, the Cron job periodically starts the Certbot container, performs the check, and renews the certificate via the webroot method when necessary. It is also important to note that Nginx reads its configuration and loads certificates only during startup, not in real time. This means it will not “see” the updated certificate until the server is restarted or its configuration is reloaded.
Thanks to Cron, the renewal process becomes fully automated, and the only remaining task for the administrator is to ensure that Nginx is properly reloaded after the certificate rotation.
Launch and Verification
Of course, the system didn’t start successfully on the first attempt, but after reviewing the mistakes, I refined the process. I believe that the sequence described in this article should work correctly.
To start all containers at once, run:
docker compose up -dIn addition to the database container, Docker will also build and start the WordPress, web server, and Certbot containers. You can check their status using:
docker psThe output should show the status of each running container:
CONTAINER ID   STATUS
0dfe7a855343   Up 3 days
385808a951cc   Up 3 days
4bdc3e884a1a   Up 3 days
As mentioned earlier, the Certbot container is not intended to run continuously – it starts, checks the certificate validity, and exits. That’s why only three containers appear in the list, which is exactly how it should be.
Once the site works correctly in the local environment, you can update the port forwarding rules on your router. After that, your site becomes accessible to Internet users using the same DNS settings as before.
Conclusion
Migrating WordPress from a traditional host-based installation into Docker becomes significantly more structured and predictable when broken into clear stages: preparing the system, deploying containers, transferring data, and properly adjusting configurations. Defining directories, mount points, networks, and environment variables correctly is essential for ensuring that the entire system operates smoothly.