
After upgrading from Raspberry Pi 4 to Raspberry Pi 5, I started migrating all my services into Docker containers, and UniFi Network Application was no exception.
In this article, I describe step-by-step how to set up the UniFi Controller Docker Raspberry Pi 5 environment, ensuring a smooth migration and long-term stability.
Introduction
Docker has long become a de facto standard for service deployment. It simplifies upgrades, isolates dependencies, and allows systems to be moved between hosts without having to reconfigure everything from scratch. For home servers and Raspberry Pi devices, this is especially relevant – a single docker-compose.yml can easily replace hours of manual setup.
At the same time, UniFi Network Application still does not have an official Docker image maintained by Ubiquiti on Docker Hub, which forces users to look for reliable community-maintained alternatives.
This migration is a natural progression after seeing the results in my WordPress performance test: Raspberry Pi 4 vs. Raspberry Pi 5. To get the best out of Docker, I recommend using a Samsung NVMe SSD on your Raspberry Pi 5.
In this article, I will focus on the containerized solution provided by the LinuxServer.io team, which has effectively become the community standard. I will walk through how to properly run UniFi Controller in Docker together with MongoDB, which ports are required for correct device operation, how the containers interact with each other, and what to keep in mind when migrating from a classic service-based installation.
Interaction diagram
To better understand the setup, I decided to visualize the interaction between the user, UniFi devices, and Docker containers in a simple diagram.
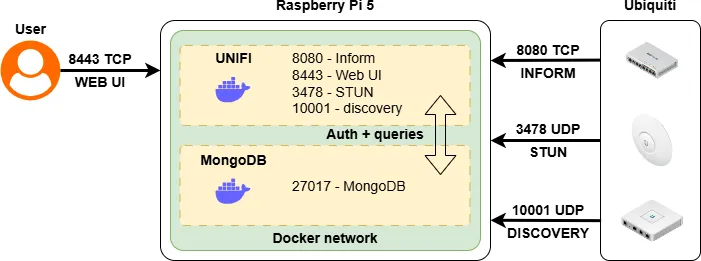
Below is a brief explanation of the ports involved:
- 8080 (inform) – the primary communication channel between UniFi devices and the controller
- 8443 (Web UI) – browser-based management interface
- 3478 (STUN) – used for determining the external address of a device when operating behind NAT
- 10001 (discovery) – automatic controller discovery within the local network
- 27017 – internal MongoDB port used only for container-to-container communication
Docker configuration file
The docker-compose.yml file contains all the necessary information to launch two Docker containers:
- MongoDB
- UniFi Network Application
To avoid hardcoding credentials and sensitive values directly into the docker-compose.yml file, all configuration variables are moved into a separate .env file. This makes variable management much cleaner and safer.
MongoDB
Previously, when MongoDB was installed as a system service on Raspberry Pi 4, I ran into hardware-related limitations – only MongoDB 4.4.18 would start successfully, while newer versions failed to launch entirely.
The reason is that starting with MongoDB 5.x, the project officially increased CPU requirements, including the need for AVX instructions. These instructions are not available on ARMv8 CPUs used in Raspberry Pi devices.
Docker solves this problem by allowing the use of architecture-compatible images (arm64) and clearly pinned versions. This means you can run exactly the MongoDB version required by a specific application (in my case, UniFi), without conflicts with system libraries, dependencies, or distribution-level limitations.
For this setup, I chose a modern version – MongoDB 8.0.
services:
  unifi-db:
    image: mongo:8.0
    container_name: unifi-db
    environment:
      - MONGO_INITDB_ROOT_USERNAME=${MONGO_INITDB_ROOT_USERNAME}
      - MONGO_INITDB_ROOT_PASSWORD=${MONGO_INITDB_ROOT_PASSWORD}
      - MONGO_USER=${MONGO_USER}
      - MONGO_PASS=${MONGO_PASS}
      - MONGO_DBNAME=${MONGO_DBNAME}
      - MONGO_AUTHSOURCE=${MONGO_AUTHSOURCE}
    volumes:
      - ./mongo/data:/data/db
      - ./init-mongo.sh:/docker-entrypoint-initdb.d/init-mongo.sh:ro
    restart: unless-stopped
...
UniFi Network Application
A similar situation existed with UniFi Controller itself. When installed as a system service, it required a separate Java Runtime Environment, which had to be manually installed and kept compatible with the controller version.
In the Docker-based setup, this issue disappears completely. The UniFi container already includes all required dependencies, including Java, specifically matched to the controller version. This significantly simplifies deployment and reduces maintenance overhead.
...
  unifi-network-application:
    image: lscr.io/linuxserver/unifi-network-application:arm64v8-9.3.45
    container_name: unifi
    environment:
      - PUID=${PUID}
      - PGID=${PGID}
      - TZ=${TZ}
      - MONGO_USER=${MONGO_USER}
      - MONGO_PASS=${MONGO_PASS}
      - MONGO_HOST=${MONGO_HOST}
      - MONGO_PORT=${MONGO_PORT}
      - MONGO_DBNAME=${MONGO_DBNAME}
      - MONGO_AUTHSOURCE=${MONGO_AUTHSOURCE}
    volumes:
      - ./unifi:/config
    ports:
      - 8443:8443
      - 3478:3478/udp
      - 10001:10001/udp
      - 8080:8080
    restart: unless-stopped
Environment variables
Special attention should be paid to moving environment variables into a .env file. This approach clearly separates configuration from code: passwords, database names, users, and other sensitive parameters are stored in a single place and are not embedded directly in docker-compose.yml.
This improves security, simplifies migration between hosts or environments, and makes the configuration much more readable. Additionally, the .env file can easily be excluded from version control, reducing the risk of accidentally leaking credentials.
For convenience, I grouped the variables into categories:
# ===== System =====
PUID=1000
PGID=1000
TZ=Europe/Kyiv

# ===== MongoDB root =====
MONGO_INITDB_ROOT_USERNAME=root
MONGO_INITDB_ROOT_PASSWORD=<strong password>

# ===== UniFi Mongo user =====
MONGO_USER=unifi
MONGO_PASS=<strong password>
MONGO_DBNAME=unifi
MONGO_AUTHSOURCE=admin

# ===== Mongo connection =====
MONGO_HOST=unifi-db
MONGO_PORT=27017
Exporting UniFi configuration
Since the controller version running on my host was 9.3.45, I used the same version in Docker to avoid compatibility issues during configuration import. The controller can be upgraded later once everything is verified to be working.
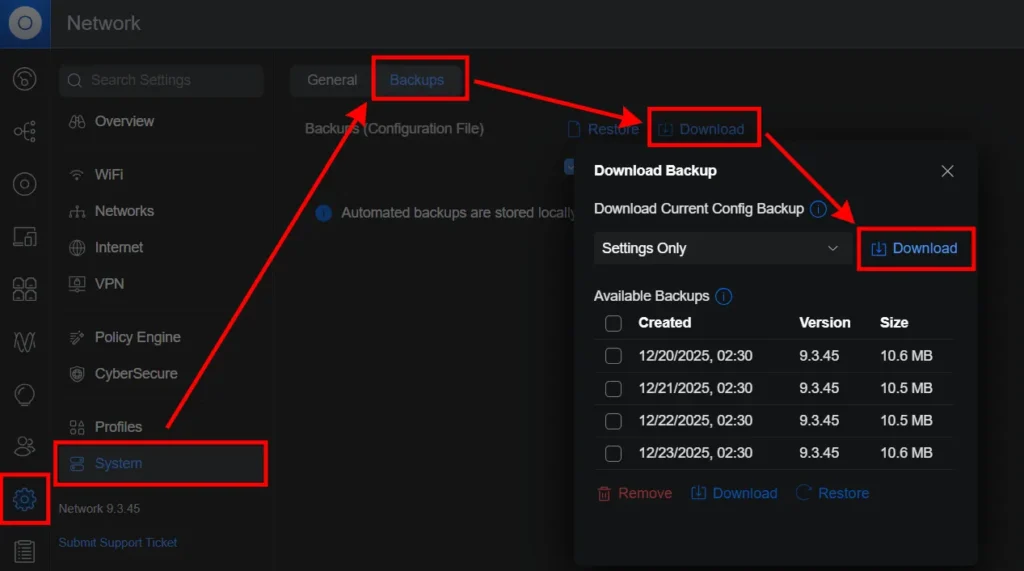
To export the configuration, log in to the existing controller, navigate to Settings → System → Backups, and download the backup file. Optionally, you can include additional data if needed.
Once the backup is downloaded, it is important to stop and disable the UniFi service on the host. Before starting Docker, there must be no other UniFi controller instances running.
First launch
To start the UniFi Network Application, simply run the following command from the project directory:
docker compose up -dThis will create and start two containers. You can verify this using:
docker compose ps

unifi lscr.io/linuxserver/unifi-network-application:arm64v8-9.3.45 "/init" unifi-network-application   5 hours ago Up 5 hours 0.0.0.0:8080->8080/tcp, [::]:8080->8080/tcp, 8843/tcp, 0.0.0.0:3478->3478/udp, [::]:3478->3478/udp, 0.0.0.0:10001->10001/udp, [::]:10001->10001/udp, 0.0.0.0:8443->8443/tcp, [::]:8443->8443/tcp, 8880/tcp

unifi-db mongo:8.0 "docker-entrypoint.s…" unifi-db 5 hours ago Up 5 hours 27017/tcp
After that, open:
https://<IP>:8443/You will be presented with the initial setup screen, offering either a fresh setup or restoring from a backup. In this case, no manual configuration is required – simply restore from the previously exported backup.
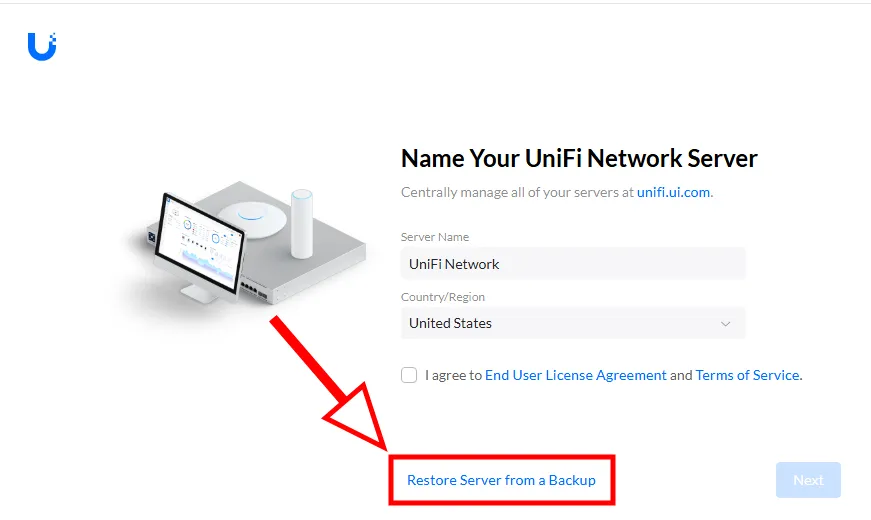
After a successful restore, you will be redirected to the controller login page and can log in using the same credentials as before.
Changing the Inform Host
After restoring the UniFi configuration, devices may appear in Adopting / Pending Adoption or Offline state. This is expected behavior – the backup still contains theold controller IP address (inform address), and devices continue to report to it.
To fix this, the Inform Host must be updated to the new controller IP or hostname. Once changed, devices will automatically reconnect and complete adoption.
Updating the inform host is crucial for devices like the UniFi Gateway Lite or the Cloud Gateway Ultra to adopt correctly to their new containerized home.
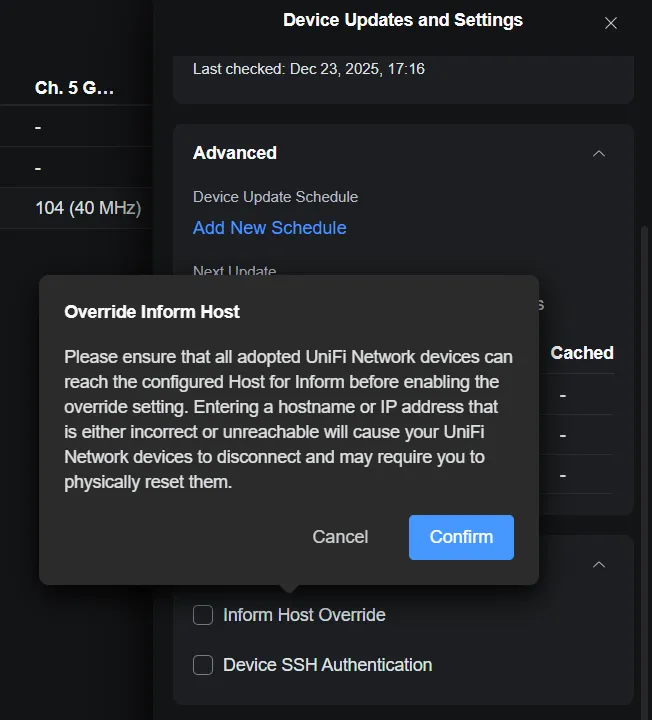
To do this, go to the “Devices” menu and click on the “Device Updates and Settings” button located at the top right. In the opened sidebar there will be a “Device Settings” section where you need to check the “Inform override Host” box. A warning will appear:
Override Inform Host
Please ensure that all adopted UniFi Network devices can reach the configured Host for Inform before enabling the override setting. Entering a hostname or IP address that is either incorrect or unreachable will cause your UniFi Network devices to disconnect and may require you to physically reset them.
Confirm by clicking the “Confirm” button.
Within a few minutes, all devices should reconnect and become active.
Performance
Since I had both setups available – UniFi running as a system service and in Docker – I compared resource usage. This comparison focuses on CPU and memory usage, not performance or throughput.
Using docker compose stats, UniFi consumes around 700–750 MB of RAM, while MongoDB uses 100–150 MB, totaling close to 1 GB. CPU usage typically stays around 1–2%, which is acceptable.

To identify services, I will use the regular htop utility and filter the load by process name:
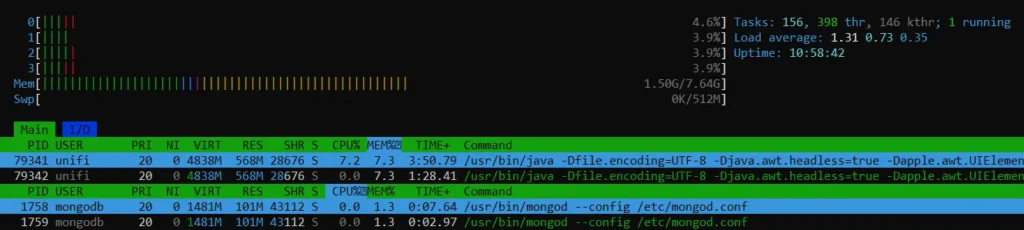
When running as system services, Java + UniFi appear to consume less memory (around 550–600 MB), with MongoDB slightly lower as well. However, this is mostly an illusion.
In reality, Docker does not consume more resources. The difference is that Docker reports memory usage more accurately, including JVM memory, caches, and cgroups, while service-based installations hide part of the usage at the system cache level. Docker provides a more honest and predictable view of actual resource consumption.
Controller Update
The previous steps are enough to work with devices using Unifi Network Application in Docker, but at the time of publication of the article, the controller version 9.3.45 looks a bit outdated.
To update the latest official version, you need to visit the website https://ui.com/download/software/uxg-lite. Currently, the latest version on the official website is 10.0.160 for Debian/Ubuntu, so you can also search for it on the LinuxServer Docker Hub. In the Latest section, there was version 10.0.162, which is a beta, so it is better not to use the latest tag but to use tested versions.
To update the version, just change the version in the image: line in the docker-compose.yml file to the current one:
image: lscr.io/linuxserver/unifi-network-application:arm64v8-10.0.160and run the command to download the new version of the container
docker compose pulland after downloading, just like last time, just run it
docker compose up -dThe new version of the UniFi Network Application will be launched!
Conclusion
Migrating UniFi Controller to Docker is a practical and reliable solution, especially for Raspberry Pi and other ARM-based platforms. Containerization removes limitations related to MongoDB versions, Java dependencies, and OS-level updates, allowing supported and up-to-date components to be used without manual tuning.
Using the LinuxServer.io image greatly simplifies deployment, upgrades, and backups. Separating configuration into a .env file improves security, readability, and reproducibility, making it easy to bring the controller up on a new host.
Backup and restore workflows enable painless migration between servers, while understanding the inform address mechanism ensures smooth device re-adoption. Overall, the Docker-based approach provides stability, transparency, and maintainability that are difficult to achieve with a traditional service-based UniFi installation.
Now that your controller is isolated in Docker, you can focus on network-wide security, such as creating an IP blacklist using Zone-Based Firewall.