Introduction
Migrating a WordPress website to a new server is no easy task — especially when minimizing downtime is crucial. In this guide, I’ll show you how I successfully performed a WordPress migration to Raspberry Pi using rsync. This method allowed me to restore my site, including LAMP stack setup and SSL certificates, in just a few minutes.
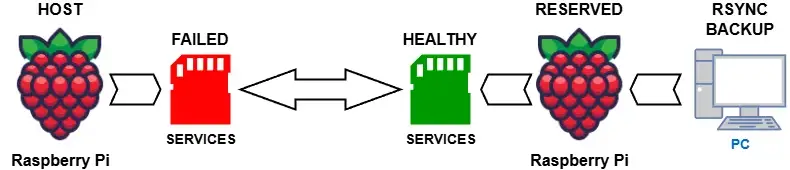
After a recent system failure, many services on my main Raspberry Pi didn’t start properly. However, Apache and the database remained functional, keeping my WordPress site alive. Rather than trying to fix everything on the spot, I decided to prepare a second Raspberry Pi and restore the site there from backup which was created with rsync application and stored on my PC. Once everything was ready, I just swapped SD cards to complete the transition with minimum downtime.
Prepare the New Raspberry Pi
Install 64-bit Raspberry Pi OS using Raspberry Pi Imager and enable SSH. Then update the system
sudo apt-get update
sudo apt-get upgrade
During the update, the user will encounter a hang in the update process due to the presence of a vnc server. To continue the update without interference, you must remove the vnc server:
sudo apt-get remove realvnc-vnc-serverThen continue the update. This is a feature of new Linux core which not support VNC feature.
Performance optimization: After migration, I recommend setting up Redis Object Cache for WordPress to speed up your site on the new hardware.
Installing the LAMP Stack
After updating the system, you need to install the Apache, PHP, and MariaDB
sudo apt install apache2 php libapache2-mod-php php-mysql mariadb-serverAlso, WordPress sometimes requires additional modules
sudo apt install php-curl php-gd php-mbstring php-xml php-zipCheck Apache service
sudo systemctl status apache2
● apache2.service - The Apache HTTP Server
     Loaded: loaded (/lib/systemd/system/apache2.service; enabled; preset: enabled)
     Active: active (running) since Wed 2025-04-09 11:37:31 EEST; 55s ago
       Docs: https://httpd.apache.org/docs/2.4/
   Main PID: 10645 (apache2)
      Tasks: 6 (limit: 9559)
        CPU: 51ms
     CGroup: /system.slice/apache2.service
Check Mariadbservice:
sudo systemctl status mariadb
● mariadb.service - MariaDB 10.11.11 database server
     Loaded: loaded (/lib/systemd/system/mariadb.service; enabled; preset: enabled)
     Active: active (running) since Wed 2025-04-09 11:37:28 EEST; 2min 6s ago
       Docs: man:mariadbd(8)
             https://mariadb.com/kb/en/library/systemd/
   Main PID: 9401 (mariadbd)
     Status: "Taking your SQL requests now..."
      Tasks: 9 (limit: 63092)
        CPU: 411ms
     CGroup: /system.slice/mariadb.service
             └─9401 /usr/sbin/mariadbd
Since the services are working, it means everything is done correctly.
Infrastructure Choice: Before migrating, I compared different web servers to find the best fit; check out my WordPress benchmark: Apache vs Nginx.
Install Certbot and Transfer Certificates
Installation of Certbot is easy, no needd to run it to generate new certificate.
sudo apt install certbot python3-certbot-apacheI already have a previously generated certificate, so I need to copy it to the new Raspberry Pi. Using the rsync command over SSH, I copy the entire contents of the /etc/letsencrypt/ directory from the PC backup to new Raspberry Pi.
sudo rsync -avz RPIB/etc/letsencrypt/ [email protected]:/etc/letsencrypt/In this case, RPIB folder is a backup / restore folder of my main Raspberry Pi.
Future-proofing: If you want to avoid manual migrations in the future, consider migrating WordPress to Docker on a Raspberry Pi.
Backing Up WordPress data
There are two steps to do it:
- Copy all physical files
- Dump the database
Copy all physical files
In the time interval between the file backup and the changes to the database on the site, there were no obvious changes in the structure or new messages, so I will use the physical files from the backup stored in the RPIB directory on the computer.
sudo rsync -avz /home/home/RPIB/var/www/html/ --rsync-path="sudo rsync" [email protected]:/var/www/html/Dump the database
On my Host Raspberry Pi I make database dump:
mysqldump -u username -ppassword wordpress_db > backup-9-4-2025.sqlAnd then I move it to the new RPI using rsync command
sudo rsync -avz backup-9-4-2025.sql [email protected]:/home/rpi/wrdprs-sql/This is due to security measures that make it impossible to connect to the database remotely, even on a local network, only on the host itself. Thus, our WordPress settings and data are copied in full.
Database Settings
Most of the settings are saved in configuration files and will not be changed, so in some cases it is enough to simply copy these files. In the case of a database, it is better to create a new user, rather than using root access. First you need to connect to the database.
sudo mysql -u root -pThe root user has not been created with a password, so when prompted to enter a password, just press enter to enter the database. The next step is to create a database and a user. Give the user privileges to work with this database. Apply the changes. I will provide a template command where you need to substitute your values. This creates a database and a user with the necessary access rights.
CREATE USER 'wp_user'@'localhost' IDENTIFIED BY 'your_strong_password';
GRANT ALL PRIVILEGES ON wordpress_db.* TO 'wp_user'@'localhost';
FLUSH PRIVILEGES;
EXIT;
The next step is to restore the database into this database:
mysql -u wp_user -p wordpress_db < backup-9-4-2025.sqlNo further database settings are required. Let’s move on to configuring the web server.
Apache Configuration
After installing the server, you need to configure a virtual host. To do this, you need to create a configuration file, or modify an existing one. I checked that I have the following default files that were previously created. I will review their contents and copy them into the new configuration:
- 000-default.conf
- 000-default-le-ssl.conf
To optimize the process, I copied the entire directory from PC backup to new Raspberry Pi:
sudo rsync -avz /home/home/RPIB/etc/apache2/ --rsync-path="sudo rsync" [email protected]:/etc/apache2/However, it is too early to restart the server, because we have not prepared the certificate files. If Apache server be rebooted now, user will get the error.
Certificate Settings
Certificates should be stored by default in the /etc/letsencrypt/ directory, so you need to create these directories or move them from the backup directory
sudo rsync -avz /home/home/RPIB/etc/letsencrypt/ --rsync-path="sudo rsync" [email protected]:/etc/letsencrypt/After that, you can check if the certbot accepts the certificate using the command:
sudo certbot certificatesYou will get an approximate answer:
Certificate Name: ostrich.kyiv.ua
Serial Number: 60f74de1ba240148er7c1efa7e7cf846417
Key Type: ECDSA
Domains: ostrich.kyiv.ua
Expiry Date: 2025-06-22 08:12:46+00:00 (VALID: 73 days)
Certificate Path: /etc/letsencrypt/live/ostrich.kyiv.ua/fullchain.pem
Private Key Path: /etc/letsencrypt/live/ostrich.kyiv.ua/privkey.pem
And after that you can restart the Apache server, in this case there will be no error about the lack of certificates:
sudo systemctl restart apache2You also need to delete the index.html file belonging to the Apache server from the /var/www/html/ directory so that the PHP index is processed when starting the site
Swap memory cards
Since the memory cards have the same settings, you can safely swap them. After rebooting the Raspberry Pi, I visited my site again, made sure that everything works. In this format, downtime was minimal!
Conclusion
This method of WordPress migration to a new Raspberry Pi shows how important it is to:
- Have a solid backup strategy
- Prepare the environment beforehand
- Use the right data transfer approach
By doing everything in advance, you can achieve a minimal-downtime WordPress migration. Whether you’re upgrading your Raspberry Pi or just switching hosting hardware, this guide will help you do it with ease.