Introduction
One of the most convenient ways to remotely control a Raspberry Pi has traditionally been to use a VNC server, which allows you to access the Raspberry Pi’s graphical interface via a local network or from the outside. However, with the release of a new official operating system – Raspberry Pi OS based on Debian Bookworm, which was officially released on October 10, 2023, the standard connection method via RealVNC Server is no longer supported.
Fortunately, the Raspberry Pi Foundation has introduced a new convenient service – Raspberry Pi Connect, which allows you to remotely control the device directly from a browser, without complex network settings or port forwarding. Beta testing of Raspberry Pi Connect began in December 2023, and the official stable release was released in April 2024.
In this article, I will write what are the necessary requirements and settings, make the first connection
Requirements
Unlike previous solutions like RealVNC, which required separate installation and configuration, Raspberry Pi Connect is already integrated into Raspberry Pi OS (Bookworm), starting with updates released after the official release in October 2023.
- Raspberry Pi OS (Bookworm) – updated to the latest packages.
- Graphical environment (Desktop edition) – Raspberry Pi Connect works only with a graphical shell.
- Raspberry Pi account – the service requires authorization via connect.raspberrypi.com, which allows you to securely connect your device to the cloud interface.
- Internet connection – Raspberry Pi must have stable access to the Internet.
If there is no physical access to the Raspberry Pi, but there is access via SSH, you can check the status of Raspberry Pi Connect and, if necessary, activate it via the command line.
Raspberry Pi OS Update
Connecting to Raspberry Pi via SSH, you need to update the operating system
sudo apt update
sudo apt full-upgrade
After updating the system, you can also check the version of the service itself
rpi-connect --version
rpi-connect 2.5.2 (revision 0691027f16f3ddbf6417b0030e1ebf50b2e74790) [arm64]
After executing these commands, the latest version of Raspberry Pi OS and Raspberry Pi Connect is used.
Graphical environment (Desktop edition)
A graphical environment means using a certain set of OS features during installation, it can be the so-called server version of Raspberry Pi OS Lite or the desktop version of Raspberry Pi OS Full. However, if you do not know which version is installed, you can check it by executing the following command
dpkg -l | grep raspberrypi-ui-mods
ii raspberrypi-ui-mods 1.20250506 arm64 Config to customise the LXDE UI for the Raspberry Pi
The presence of the raspberrypi-ui-mods entry indicates the presence of a graphical environment.
Raspberry Pi account
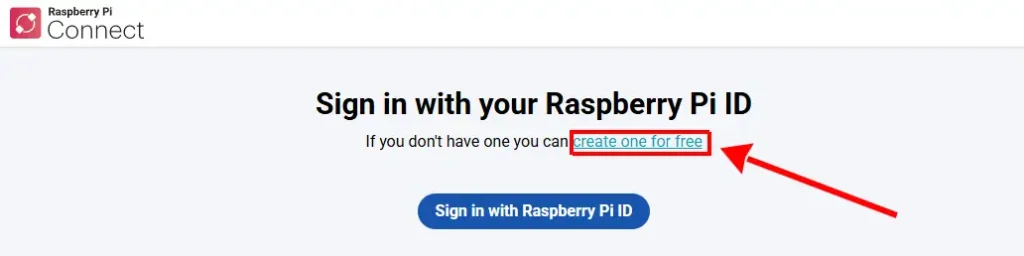
To create an account, you need to go to the link https://connect.raspberrypi.com/sign-in and click on the link create one for free
To register, you need to fill out the form:
- Password and Re-enter password
- Name (Nick) What should we call you?
- Agree to the Terms and Conditions
I have also activated 2FA to improve the security of my account.
Internet connection
Since this is an online service, an Internet connection is a prerequisite.
Connecting Raspberry Pi to Raspberry Pi Connect account
Since all the requirements are met, you need to perform additional settings, namely start the service with the command
rpi-connect on
✓ Raspberry Pi Connect started
This message indicates that the service has started and is working correctly. Now you need to link the device to the Connect account. by executing the following command
rpi-connect signin
Complete sign in by visiting https://connect.raspberrypi.com/verify/XXXX-XXXX
The result of this command will be a link with an 8-symbol code. You need to open this link in a browser for further device registration.
I recommend logging into your account in advance to then speed up the registration completion process
In this window, you need to enter a name for your device. This name will be displayed in the account and will be the identifier of this particular device. If you have multiple devices, it is better to give them unique names.

Click on Create device and sign in to add the device. In the window we will see a message about the successful completion of the connection
Device sign in successful
Your device Ostrich RPI now has access to your account. If this was a mistake, you can delete the device and its access tokens.
You can now close this window, or view all devices.

At this time, an additional line will appear in the terminal
rpi-connect signin
Complete sign in by visiting https://connect.raspberrypi.com/verify/XXXX-XXXX

✓ Signed in
This indicates the successful connection of the Raspberry Pi with the Raspberry Pi Connect account.
Connection
In the browser, follow the link view all devices, and you will get to the main screen where there is a list of connected devices and their status

To connect graphically, you need to select Screen sharing from the Connect via drop-down list. In a new window, for a short period of time, until the connection is complete, the user will see a black screen message Waiting for response from Ostrich RPI

After that, the user will see the familiar Raspberry Pi OS desktop and will be able to control the mouse.

Conclusion
The appearance of Raspberry Pi Connect has greatly simplified remote control of the device without the need for complex VNC or port forwarding settings. Thanks to integration with Raspberry Pi OS (starting with the version based on Debian Bookworm), this service opens up new possibilities for users who want to have quick access to their Raspberry Pi from anywhere in the world.
If you have a version with a graphical interface installed, activating Raspberry Pi Connect takes only a few minutes and does not require additional software. This is a great solution for developers, enthusiasts, and educational projects that require stable and secure remote access.