
If you self-host your UniFi controller, you have likely encountered a banner on the Network Application dashboard prompting you to upgrade. In this article, I will describe how to migrate UniFi to a UniFi OS Server running on a Raspberry Pi 5. We will walk through the process step-by-step: stopping the old Docker container, deploying an isolated Podman environment, and restoring your network configuration from a .unf file.
If you started your self-hosted journey with my guide on how to install UniFi controller on Raspberry Pi 4 or followed the tutorial on running UniFi Network Application in Docker, this migration is the logical next step for your network’s evolution.
Screenshot of a reminder to update to UniFi on UniFi OS Server
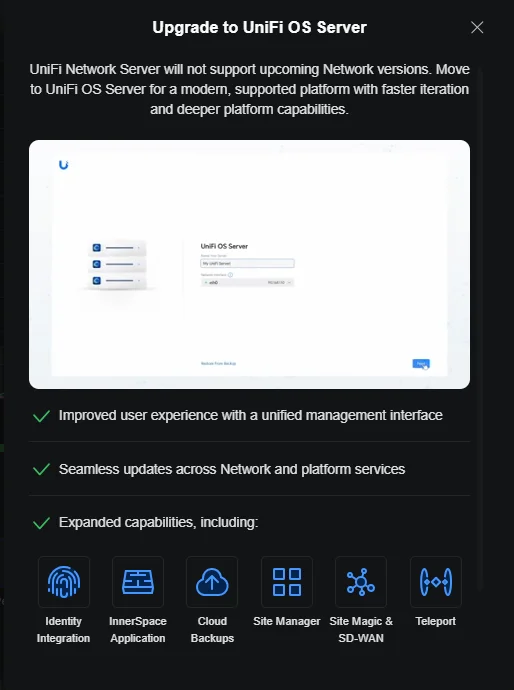
The point is that Ubiquiti is completely changing its approach to self-hosted solutions. Instead of a standalone “Network Application,” they now offer a full-fledged UniFi OS Server environment – deployed via Podman containerization – that delivers the same user experience found on the company’s proprietary consoles.
Creating a backup of the current system
The most important rule for any migration is to create a backup. Since we are completely changing the controller architecture, we need a full network configuration file.
- Go to the menu: Settings -> System -> Backups.
- Click “Download” and select the desired backup date.
- Save the file (with the .unf extension) to a secure location on your computer.
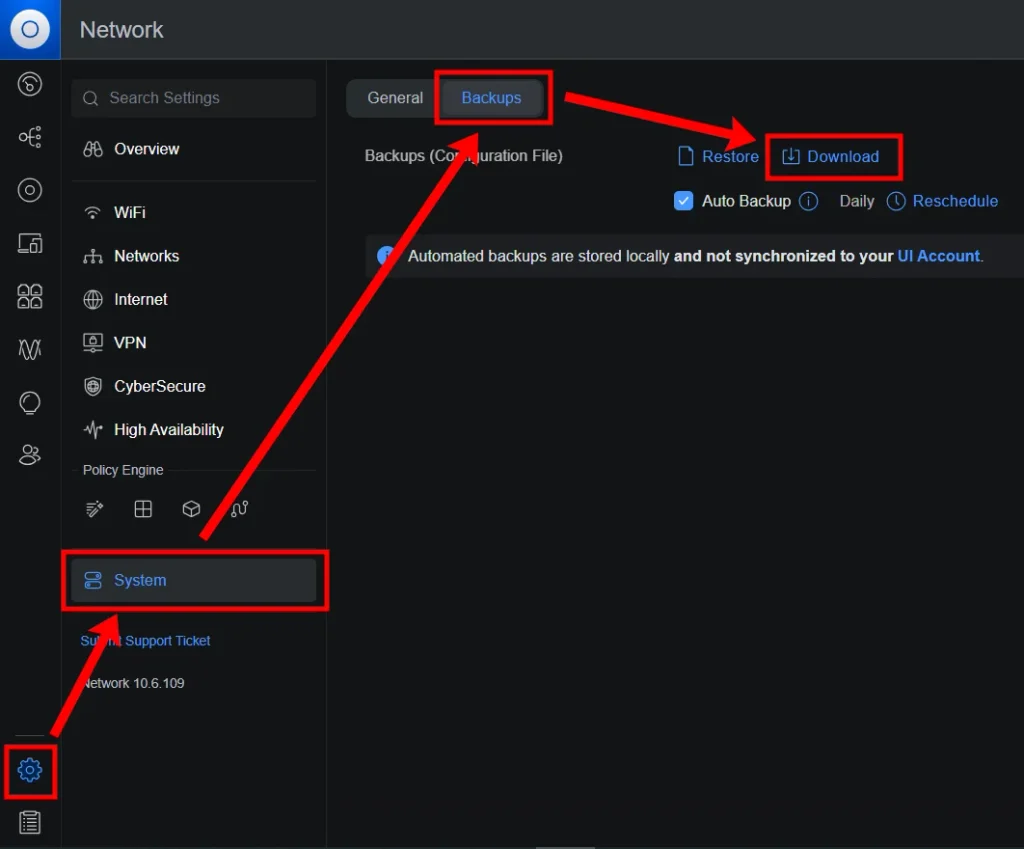
My backups are created automatically every day at 2:30 AM. My backup file is named network_backup_06.11.2026_02-30_v10.6.109.unf
Once your migration is complete and stable, don’t forget to harden your perimeter – check out my guide on creating an IP blacklist using Zone-Based Firewall on a UniFi router.
Stopping the old container
Log in to the Raspberry Pi via SSH and stop the old container. The command will vary depending on how you deployed it.
I launched Docker using Docker Compose.
Since the new UniFi OS Server will use the same system ports to communicate with access points (8080, 8443, 3478, etc.), we need to free them up. Port conflicts are the most common error encountered during this migration.
First, you need to navigate to the working directory and run the command:
docker compose down
[+] down 3/3
✔ Container unifi-db Removed 0.4s
✔ Container unifi Removed 10.4s
✔ Network unifi_default Removed 0.1s
All containers related to Unifi have been stopped and removed.
Installing Podman
The new installer from Ubiquiti is based on the Podman engine. It works perfectly well on the same machine alongside standard Docker, so we simply need to add it to the system:
sudo apt update
sudo apt install podman slirp4netns
We are installing Podman as a container environment, and the slirp4netns package is required so that the UniFi Controller can securely interact with our local network without needing root privileges on the system.
To verify that Podman is installed, let’s determine its version:
podman --version
podman version 5.4.2
Downloading and Installing UniFi OS Server
At the time of this article’s publication, the current stable version is UniFi OS Server 5.1.42 for Linux (arm64). This is the version we will install. To shorten the name, we will rename the file to something simpler – for example, unifiosinstaller – directly within the download command.
wget -O unifiosinstaller "https://fw-download.ubnt.com/data/unifi-os-server/f730-linux-arm64-5.1.42-d2bca8bd-d6fc-4d20-99e5-b78235843c2f.42-arm64"Granting the right to execute
chmod +x unifiosinstallerAnd the final step – we launch the installation process.
sudo ./unifiosinstaller
You are about to install UniFi OS Server version 5.1.42.
Proceed? (y/N): y
I’ve hidden the full installation process in a spoiler:
INFO Installing UniFi OS Server 5.1.42...
INFO Checking compatible podman runtime available...
INFO Checking disk space for required directories...
INFO - /home/: Requires 15.00 GB, available 81.76 GB
INFO - /var/lib/uosserver: Requires 1.00 GB, available 81.76 GB
INFO - /usr/local/bin/: Requires 0.12 GB, available 81.76 GB
INFO - /tmp/: Requires 2.00 GB, available 3.94 GB
INFO - /var/tmp/: Requires 2.00 GB, available 81.76 GB
INFO All disk space requirements met.
INFO Checking ports...
INFO Adding uosserver user and group...
INFO Adding user 'rpi' to 'uosserver' group...
INFO Creating /var/lib/uosserver dir...
INFO Creating /var/lib/uosserver/bin dir...
INFO Creating /var/lib/uosserver/logs dir...
INFO Creating /home/uosserver/.config dir...
INFO Creating /home/uosserver/.local dir...
INFO Creating /home/uosserver/tmp dir...
INFO Creating /home/uosserver/.config/containers dir...
INFO Creating /home/uosserver/.config dir...
INFO Creating /home/uosserver/.local/share dir...
INFO Setting up /var/lib/uosserver/portmap.json file...
INFO Setting up /var/lib/uosserver/mounts.json file...
INFO Setting up /usr/local/bin/uosserver binary...
INFO Setting up /usr/local/bin/uosserver-purge binary...
INFO Setting up /var/lib/uosserver/bin/discovery binary...
INFO Setting up /var/lib/uosserver/bin/pasta binary...
INFO Setting up /var/lib/uosserver/bin/uosserver-service service binary...
INFO Setting up /var/lib/uosserver/bin/updater-service binary...
INFO Initializing podman conf...
INFO Allowing raw socket execution...
INFO Creating file /var/lib/uosserver/server.conf...
INFO Creating systemd services...
INFO Loading container image...
INFO [podman] Getting image source signatures
INFO [podman] Copying blob sha256:104799d4ff5b18bad31a13cbbc383730eebef29a1cac161b7905792a8dbe5bd3
INFO [podman] Copying blob sha256:4f4fb700ef54461cfa02571ae0db9a0dc1e0cdb5577484a6d75e68dc38e8acc1
INFO [podman] Copying blob sha256:6ead6cf9b03eaf98dfb1d1f44248d3f07f0204768a7216ac8b4b595b3ccbbfb5
INFO [podman] Copying blob sha256:2f1fabd6996e166495bb3135a04d43f4c67177e8adc8af82e97b3b96e7c6903c
INFO [podman] Copying blob sha256:163572df90516683b16db199ca300a91f4dd1626616453cd312f9320d79a795e
INFO [podman] Copying blob sha256:e2280296e50e3d1722c2c7b027da0263ed9c97bd136e1ae1cede56a5409a4934
INFO [podman] Copying blob sha256:94affbd2e5d1e4b842fa41ee28e146ff37476ed36b86f002f5252d216108e001
INFO [podman] Copying blob sha256:d5972ffc155bda2da0015b93164773a5685b9e784c1b340cad537313d09e69ab
INFO [podman] Copying blob sha256:496eab1cc43238a07e7497fe918f7e9b2554ad33e814d843b795dd0ba4e4ba47
INFO [podman] Copying blob sha256:d6c0aea61236768e96654a43f0f4b6ece37e38215aa969a9e66936dd595734e4
INFO [podman] Copying blob sha256:39e1bd5159680c6dddcc244a89e0319d97f789cdd28192976f8482a8a729bd63
INFO [podman] Copying config sha256:ad6a329d32292a6438840f51f30d798be05b5119416e371619f8c6eb9ed2e42f
INFO [podman] Writing manifest to image destination
INFO [podman] Loaded image: docker.io/library/uosserver:c9603dec9010
INFO Starting container...
INFO Initializing container...
INFO Container doesn't exist, creating new...
INFO dac27ec9929090ba50f70ab7975158e6d95adf62879909356248185cf7392c47
INFO run --detach --pids-limit 65536 --systemd=always --name uosserver --restart unless-stopped --health-cmd curl --fail http://127.0.0.1/api/ping || exit 1 --health-interval 60s --health-timeout 5s --health-retries 3 --network pasta:--ns-ifname,eth0,--map-host-loopback,203.0.113.113,--dns-forward,203.0.113.113 --add-host host.docker.internal:203.0.113.113 --add-host host.containers.internal:203.0.113.113 --dns 203.0.113.113 --cap-add=NET_RAW --cap-add=NET_ADMIN -e UOS_UUID=f940cced-cd34-5daa-8286-52806a0d84d4 -e APP_VERSION=5.1.42 -e APP_MODEL=UOSSERVER -e PRODUCT_NAME=UniFi OS Server -e FIRMWARE_PLATFORM=linux-arm64 -v uosserver_persistent:/persistent -v uosserver_var_log:/var/log -v uosserver_data:/data -v uosserver_srv:/srv -v uosserver_etc_rabbitmq_ssl:/etc/rabbitmq/ssl -v uosserver_var_lib_mongodb:/var/lib/mongodb -v uosserver_var_lib_unifi:/var/lib/unifi -p 0.0.0.0:9543:9543 -p 0.0.0.0:28082:28082 -p 0.0.0.0:3478:3478/udp -p 0.0.0.0:5514:5514/udp -p 0.0.0.0:5671:5671 -p 0.0.0.0:6789:6789 -p 0.0.0.0:8080:8080 -p 0.0.0.0:8444:8444 -p 0.0.0.0:8880:8880 -p 0.0.0.0:8881:8881 -p 0.0.0.0:8882:8882 -p 127.0.0.1:11084:11084 -p 0.0.0.0:10003:10003/udp -p 0.0.0.0:11443:443 docker.io/library/uosserver:c9603dec9010
INFO Waiting for container 'uosserver' to start (timeout: 60s)
INFO Container 'uosserver' is running. (elapsed: 0.0s)
INFO Waiting for systemd to be ready (timeout: 60s)
INFO Systemd is ready. (elapsed: 0.0s)
INFO Starting uosserver systemd service...
INFO Waiting for UniFi OS Server to start...
INFO
!!! INSTALLATION COMPLETE !!!
To grant permission for a user to run 'uosserver' commands:
-> Add the user to the 'uosserver' group:
usermod -aG uosserver
-> Then log out and log back in for the changes to take effect.
To get started with available commands, run:
uosserver help
The UniFi OS Server will be launched and accessible via port 11443: https://192.168.99.44:11443/. This address will open the initial setup window for the UniFi OS Server.
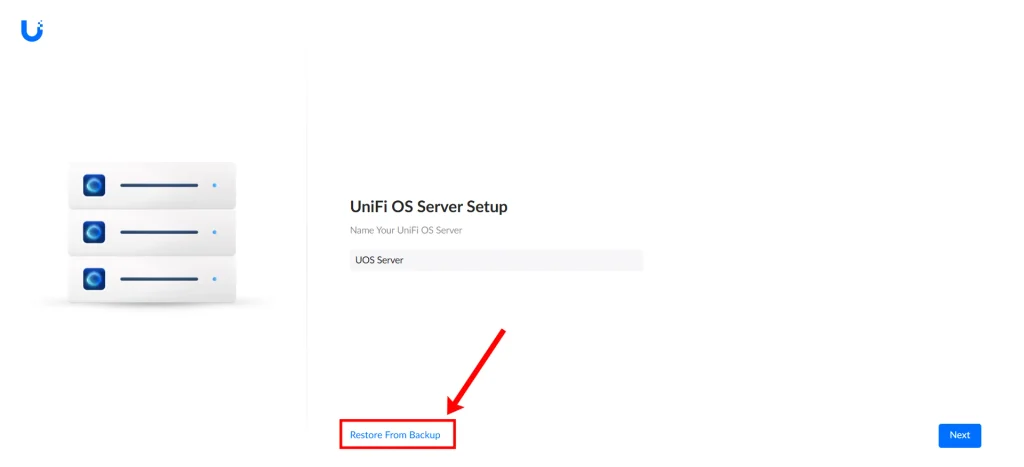
In my case, I need to restore settings from a backup file. At the bottom of the page, there will be a “Restore From Backup” link.
Restoring a Backup
To restore a backup, you must first sign in to your UniFi profile by entering your username and password, agreeing to the terms, and if necessary – entering a two-factor authentication code.
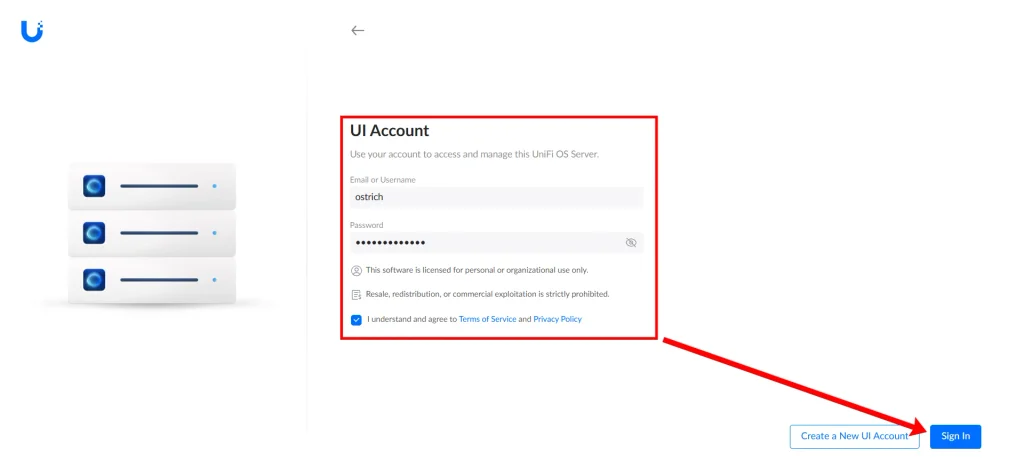
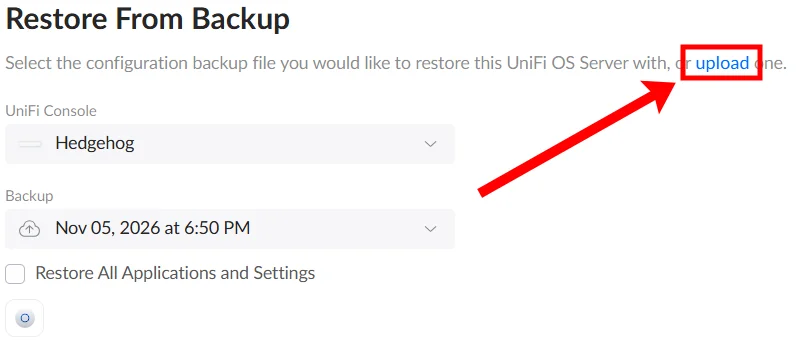
After logging in, cloud backups will be suggested for restoration; however, in my case, there are no cloud backups, so I will need to select a local file for the restoration.
Select the configuration backup file you would like to restore this UniFi OS Server with, or upload one.
To do this, click on the blue “upload” link and select the backup file that was created in the first step.
In the next step, you can simply drag and drop the file, or open it, for subsequent recovery.
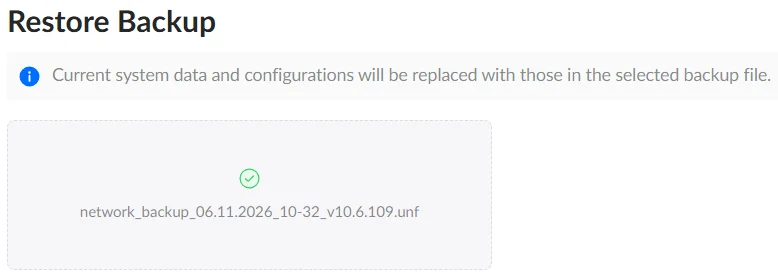
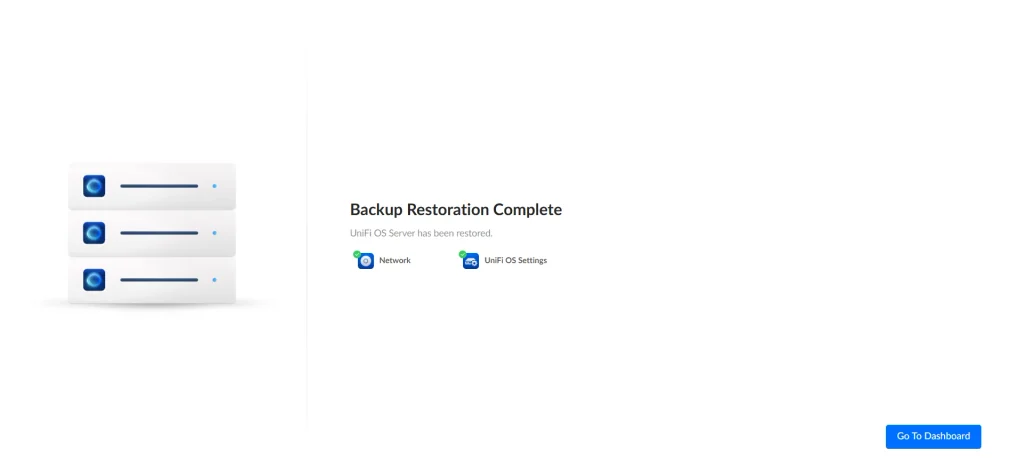
Click the “Restore” button and wait for the settings restoration to complete. The restoration process may take about 5 minutes. During the process, a list of previously active services or devices will be generated; in my case, these are:
- Network
- UniFi OS Settings
Here is what the window looks like once the backup restoration has been successfully completed.
Should you switch to UniFi OS Server?
Migrating from a classic Docker container to Ubiquiti’s new architecture is not merely a cosmetic dashboard update; it is a fundamental shift to a more modern and secure stack.
Here are the key takeaways following deployment and load testing on a Raspberry Pi 5:
- Security comes first. The standout feature of the new installer is its use of the Podman engine in “rootless” mode. Your controller now runs under an isolated user account,
uosserver, rather than via the all-powerful Docker daemon. Even network traffic is routed through user-space. For self-hosted solutions that are often exposed to the internet, this is a major advantage. - No miracles regarding RAM usage. Moving away from standard Docker didn’t make the controller any “lighter.” The Java runtime and the MongoDB database still consume roughly 1.2–1.4 GB of RAM, regardless of how they are packaged.
- Slight CPU overhead. At idle, the load on the processor (Broadcom BCM2712) increased from ~0.8% to ~2.7%. This is the trade-off for user-space networking and the additional background services inherent to UniFi OS itself. However, given the capabilities of the Raspberry Pi 5 (and even the Pi 4), these figures are completely negligible.
- An “out-of-the-box” experience. You get the exact same interface and management logic as users of premium hardware consoles like the UDM-Pro or Cloud Key. System updates and backups can now be conveniently managed from a single portal.
The migration process proved remarkably smooth: the old .unf backup imported perfectly, and all access points reconnected without any hassle or complex workarounds. If you are still keeping your controller in a legacy container, it is time to upgrade. The Server OS architecture is stable, and the transition process takes just a few minutes.