
Why Block IPs at the Gateway Level
Whenever you expose any service to the public internet—such as a self-hosted Postfix mail server—it immediately becomes a target for botnets and script kiddies attempting brute-force attacks or vulnerability scans. The standard approach is using Fail2ban to parse logs and ban offending IPs via local iptables rules on the host machine.
However, this method has a major flaw: malicious traffic still passes through your router, enters your local network, and is only dropped at the destination server. It is far more efficient to drop those packets at the network perimeter—directly on your hardware gateway (in my setup, a UniFi UXG-Lite).
Previously, automating UniFi firewall rules was clunky because the legacy UniFi Network Application lacked native API key support, forcing admins to rely on fragile session cookie workarounds. With the transition to UniFi OS Server, full API key authentication is finally available, making Fail2ban UniFi OS Server API integration reliable, clean, and secure.
In this guide, I will walk you through configuring Fail2ban to automatically push malicious IP addresses into a UniFi firewall blacklist via the REST API.
Creating an API Key in UniFi OS
First, generate an authentication token so our script can communicate with the UniFi OS Server:
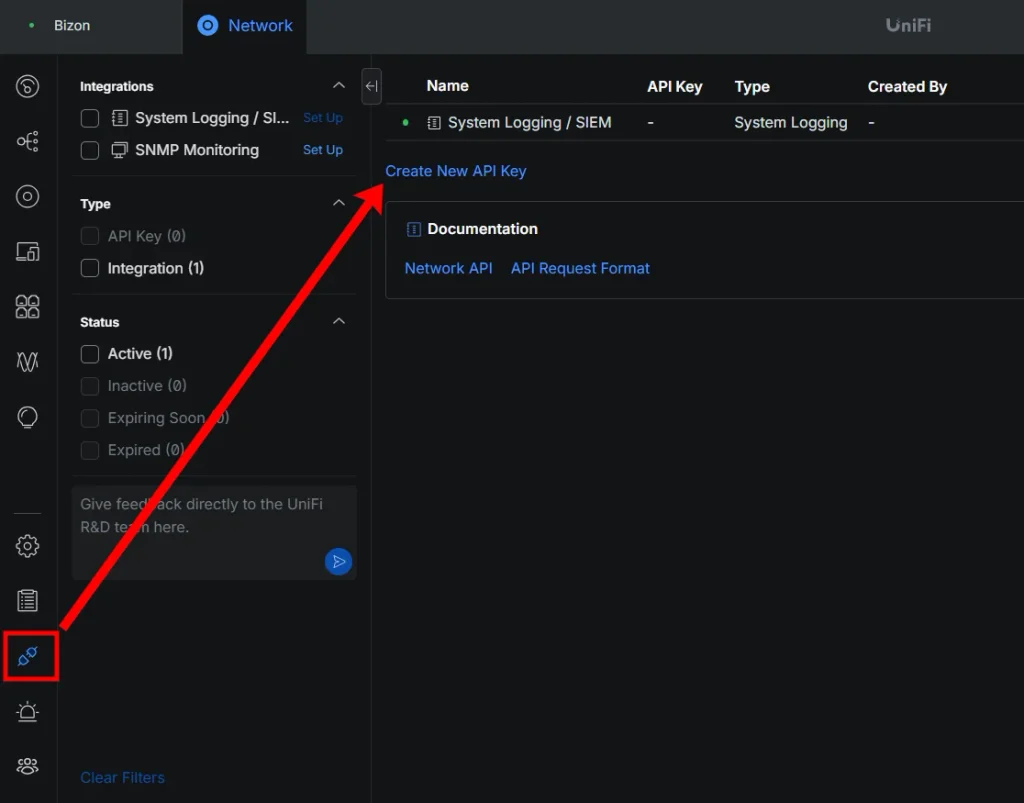
- Log in to the web interface of your UniFi OS Server.
- Navigate to Settings -> Integrations and click Create New API key.
- In the side panel, enter a Name (e.g.,
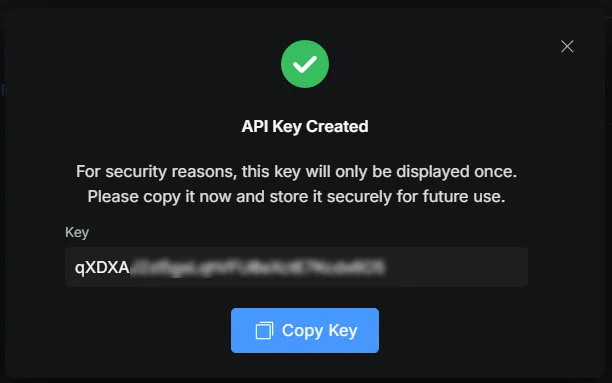
Fail2ban), set an optional Description and Expiry, and click Create. - Copy and save the generated token in a secure location – you will need it in the next step.
Before proceeding, make sure you have already created an IP Address Group (Firewall Group) in your UniFi Network settings (for example, Postfix Black List), applied it to a Drop firewall rule, and copied its Group ID from the browser URL or API response.
Writing the Python Script for the UniFi API
Because the UniFi REST API does not support a PATCH method to append a single IP address, our script must fetch the entire current list (GET), append the new IP, and push the updated list back (PUT).
See also: UniFi Gateway Lite (UXG-Lite) overview
To prevent the blacklist from growing indefinitely and hitting router hardware limits, the script uses Python’s ipaddress module to automatically merge adjacent IPs into the smallest possible set of CIDR subnets.
Create the script file:
sudo nano /usr/local/bin/unifi_block.pyPaste the following code, replacing UNIFI_IP, API_KEY, and GROUP_ID with your actual environment values:
unifi_block.py
#!/usr/bin/env python3
import sys
import requests
import urllib3
import ipaddress

urllib3.disable_warnings(urllib3.exceptions.InsecureRequestWarning)

UNIFI_IP = "192.168.99.44"
PORT = "11443"
API_KEY = "YOUR_API_KEY"
GROUP_ID = "YOUR_LIST_ID"
SITE = "default"

BASE_URL = f"https://{UNIFI_IP}:{PORT}/proxy/network/api/s/{SITE}/rest/firewallgroup/{GROUP_ID}"

HEADERS = {
    "Content-Type": "application/json",
    "X-API-Key": API_KEY,
    "Accept": "application/json"
}

def optimize_cidrs(ip_list):
    networks = []
    for ip in ip_list:
        if not ip:
            continue
        try:
            networks.append(ipaddress.ip_network(ip, strict=False))
        except ValueError:
            continue

    collapsed = ipaddress.collapse_addresses(networks)
    result = []
    for net in collapsed:
        # UniFi API rejects /32 masks for single IPs, so strip the prefix for single hosts
        if net.prefixlen == 32:
            result.append(str(net.network_address))
        else:
            result.append(str(net))
    return result

def main():
    if len(sys.argv) != 2:
        print("Usage: unifi_block.py <IP_ADDRESS>")
        sys.exit(1)

    new_ip = sys.argv[1]

    # 1. Fetch the current firewall group state
    try:
        response = requests.get(BASE_URL, headers=HEADERS, verify=False)
        response.raise_for_status()
        data = response.json()

        if 'data' not in data or len(data['data']) == 0:
            print("Error: Could not find the specified firewall group.")
            sys.exit(1)

        group_data = data['data'][0]
        current_members = group_data.get('group_members', [])

    except Exception as e:
        print(f"Error fetching group data: {e}")
        sys.exit(1)

    # 2. Append the new IP and collapse/optimize CIDR subnets
    current_members.append(new_ip)
    optimized_members = optimize_cidrs(current_members)

    # 3. Update the IP array inside the original object
    group_data['group_members'] = optimized_members

    # 4. Push the full updated object back via PUT
    try:
        put_response = requests.put(BASE_URL, headers=HEADERS, json=group_data, verify=False)
        put_response.raise_for_status()
        print(f"Successfully added {new_ip}. Optimized list to {len(optimized_members)} entries.")
    except Exception as e:
        print(f"Error updating firewall group: {e}")
        if hasattr(e, 'response') and e.response is not None:
            print(f"API response details: {e.response.text}")
        sys.exit(1)

if __name__ == "__main__":
    main()
Make the script executable:
sudo chmod +x /usr/local/bin/unifi_block.pyInstalling Fail2ban and Dependencies
On the host system running your service (or where your service logs are mounted), install Fail2ban and the required Python libraries:
sudo apt update
sudo apt install fail2ban python3-requests python3-urllib3
See also: Postfix monitoring in Zabbix guide
Next, create a custom Fail2ban action that triggers our Python script whenever an attack is detected:
sudo nano /etc/fail2ban/action.d/unifi-api.confAdd the following configuration. Fail2ban will automatically substitute <ip> with the attacker’s IP address:
[Definition]
# Action executed when banning an IP
actionban = /usr/local/bin/unifi_block.py <ip>

# Action executed when unbanning (left empty for permanent hardware bans)
actionunban =

actionstart =
actionstop =
actioncheck =
Configuring the Fail2ban Jail
Now instruct Fail2ban on which log files to monitor and which action to execute. Here is an example configuration for a Postfix mail server:
sudo nano /etc/fail2ban/jail.localAdd the jail definition:
[postfix-unifi]
enabled  = true
filter   = postfix
# Ensure this points to your actual mail log path on the host
logpath  = /var/log/mail.log
action   = unifi-api
maxretry = 3
findtime = 3600
# -1 sets a permanent ban (manage/remove IPs via the UniFi GUI)
bantime  = -1
Please note: if your Postfix service is installed on a host, ensure that the logpath points to the actual location of the mounted log file on the host system.
Starting and Testing the Integration
Reload Fail2ban to apply the new configuration and verify the jail status:
sudo systemctl restart fail2ban
sudo fail2ban-client status postfix-unifi
Instead of waiting for a live attack, test the script manually from the terminal:
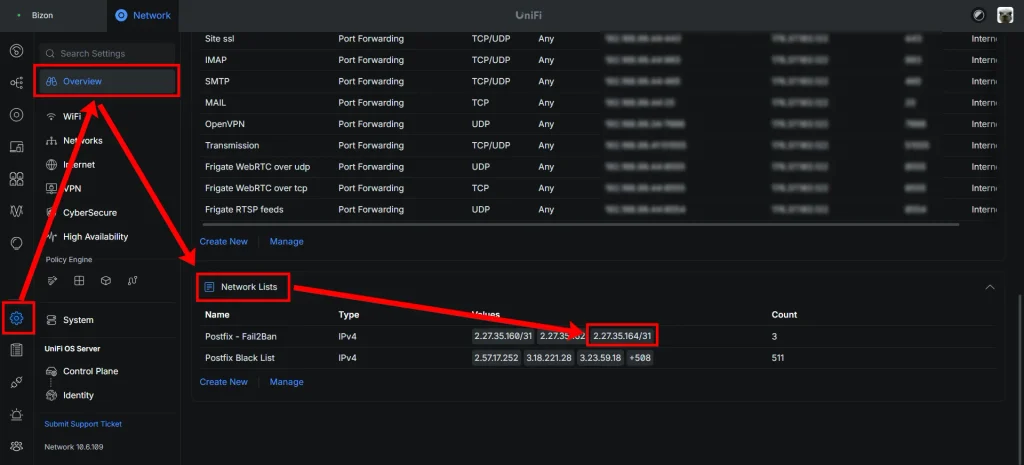
/usr/local/bin/unifi_block.py 2.27.35.164/31Expected output:
Успішно додано 2.27.35.164/31. Оптимізовано до 3 записів.Refresh your UniFi OS Server web interface and inspect your firewall IP group. The test subnet will appear immediately, meaning your UniFi gateway is now actively dropping all packets from that source before they even reach your LAN.
Conclusion: Perimeter Defense at the Hardware Gateway
Moving IP blocking from host-level software (iptables) to your hardware gateway (UniFi UXG-Lite) elevates your infrastructure security. You aren’t just defending a single service; you are stopping malicious actors at the front door, saving server CPU cycles, and preventing attackers from probing other ports on your local network.
Key benefits of this setup:
Extensibility: Using the exact same action, you can easily protect SSH, Nginx, WordPress, or any other self-hosted service that writes authentication logs.
Full Automation: Fail2ban acts as an intelligent log parser that triggers hardware-level firewall blocks in real time.
Resource Optimization: Automatic CIDR aggregation ensures your router’s firewall group limits aren’t exhausted during distributed brute-force campaigns from adjacent IP blocks.