Welcome to WordPress 7
The release of a new major version of WordPress 7 is always a big event, bringing new features, optimizations, and security updates. It would seem that the upgrade process has long been reduced to clicking a single button in the control panel. However, when your site is deployed as WordPress in a Docker environment, the standard “Update” click is only half the battle. In this guide, we will analyze how to properly make backups, avoid mysqldump errors, and rebuild containers without losing data.

Below I will share my experience on how to properly and safely update WordPress in a Docker environment.
How I set it up
My project runs on Docker using several linked containers, which are described in docker-compose.yml. The architecture looks like this:
- Database: mysql:8.4
- Webserver: nginx:stable-alpine
- Cache: redis:alpine (for Object Cache)
- PHP/Core: Custom image based on wordpress:fpm-alpine, where the Redis extension is additionally compiled via Dockerfile.
WordPress files themselves are placed on the host machine via volume (./ostrich:/var/www/html), which makes the system stable and allows for convenient content management.
Initial Setup: To understand how this multi-container environment was built, check my guide on how to migrate WordPress to Docker on a Raspberry Pi.
Backup: Files and Database
Since the site files are spread across volumes, archiving them takes a few seconds:
tar -czvf wp_files_backup_$(date +%F).tar.gz ./ostrichDatabase Backup (and Fixing the Access Denied Error)
When dumping a database from MySQL 8.4, you may encounter the following error when using the command:
docker compose exec db sh -c 'mysqldump -u"$MYSQL_USER" -p"$MYSQL_PASSWORD" wordpress' > wp_db_backup_$(date +%F).sqlError: ‘Access denied; you need (at least one of) the PROCESS privilege(s) for this operation’ when trying to dump tablespaces
This happens because in new versions of MySQL, the mysqldump utility by default tries to export information about tablespaces, which a regular WordPress database user does not have rights to do. Since this information is absolutely not needed to restore the site, it is enough to add the –no-tablespaces flag:
docker compose exec db sh -c 'mysqldump -u"$MYSQL_USER" -p"$MYSQL_PASSWORD" --no-tablespaces wordpress' > wp_db_backup_$(date +%F).sqlAfter the backup is complete, two files will appear in the working directory:
- wp_db_backup_2026-05-21.sql
- wp_files_backup_2026-05-21.tar.gz
Now you can safely proceed to the update.
Update via admin panel
Since WordPress files are mounted on the host via volumes, we can safely click the update button directly in the WordPress admin panel.
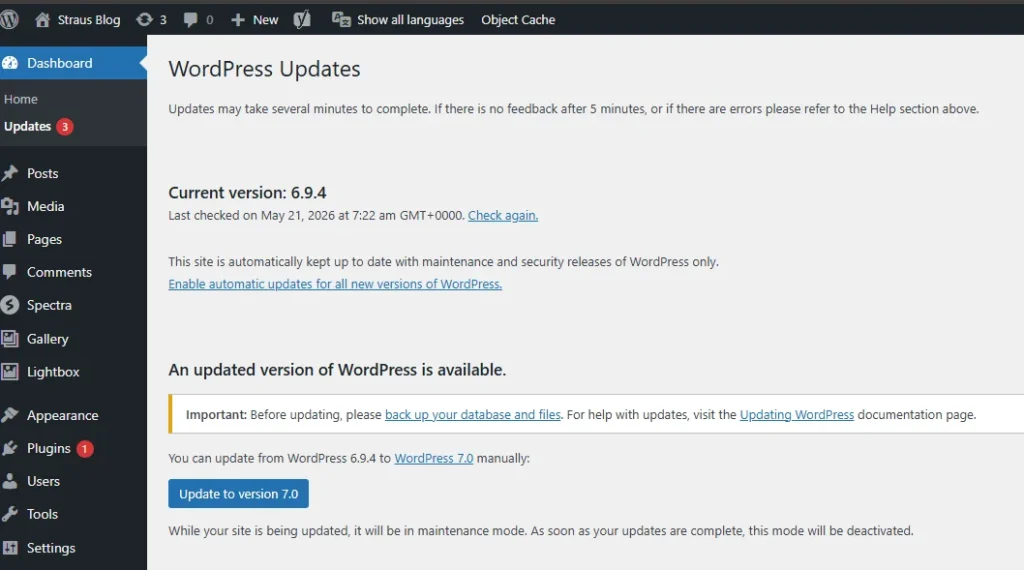
The system will download the new kernel files version 7 and automatically overwrite them in the local directory ./ostrich. Visually, the site has already been updated, but there is one more critical step in the Docker environment.
Web Server Choice: Since your stack uses Nginx instead of the standard LAMP stack, see my WordPress benchmark: Apache vs Nginx.
Rebuilding the container
If we stop at the previous step, we will end up with the new WordPress 7 files, but the old base image wordpress:fpm-alpine with an outdated version of PHP and system libraries. For large releases, this can cause serious conflicts.
To synchronize system dependencies and update PHP to the version that comes with the fresh WordPress Docker image, we need to rebuild the container:
docker compose build --no-cache wordpress
docker compose up -d wordpress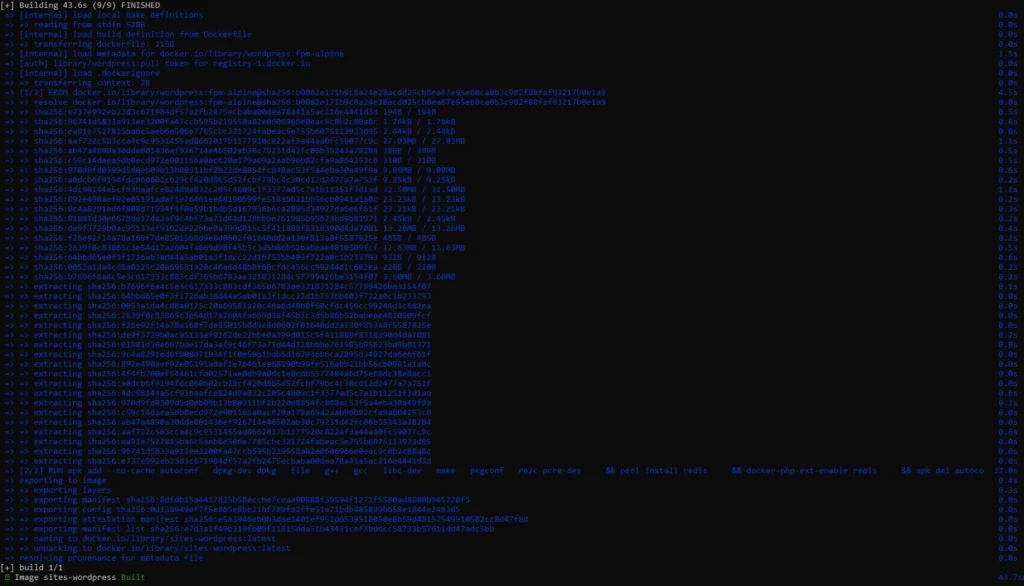
During this process, Docker will pull the latest base image, reinstall the Redis extension, and launch the updated container. Our files (already updated to version 7) and database will be safely pulled from their respective volumes.
Stack Monitoring: Keep your new deployment under control by monitoring Docker container activity in Zabbix.
Conclusions
Updating WordPress in a Docker environment requires a little more understanding of the processes than on regular hosting. However, this approach gives full control over the system. We can use the convenience of updating through the admin panel, while keeping system libraries and PHP up to date by rebuilding the image. And most importantly – in case of any failure, we have ready backups of the database and files for instant rollback.